Friday, December 30, 2011

Books I read in 2011!

My goal in 2011 was to read read read...and I did just that!!
I put a * next to some of my favorites!

Heart of the Matter
Cold Tangerines *
Room  *
Bittersweet
The Help **
A Homemade Life: Stories and Recipes from My Kitchen Table
As Husbands Go
My Life From Scratch
Chasing Harry Winston
A Vintage Affair * 
Red Hook Road *
Cinderella (As If You Didn't Already Know the Story)
Last Night at Chateau Marmont
The Swan House *
Saving CeeCee Honeycutt  **
Three Cups of Tea
Thumbelina, Tiny Runaway Bride
Zoo Story: Life in the Garden of Captives *
One Day
Debt-Free U
Three Weissmanns of Westport
Water for Elephant
What Alice Forgot *
Crazy Sexy Diet *
The China Study **
The Kind Diet
Rob Lowe : Stories I only tell my friends
The Cookbook Collector
The Beauty Detox Solution
Clean Start
The Hunger Games *
Catching Fire (The second Hunger Games) *
The Luxe *
Envy: A Luxe Novel *
Rumors: A Luxe Novel *
Splendor: A Luxe Novel *


Thursday, December 29, 2011

A sweet gift exchange~

I have a group of wonderful friends that I have met via the Internet...truly special lovely ladies!
A few of us did a small gift exchange this year.  My friend Catie came up with the idea of an "Altoid Tin" exchange...where we would empty a tin and then we each put our own twist on it!

Lisa created this darling "evening out survival kit" for me!
It is covered in faux leather, a gold toggle clasp, and the darling flower on top!


Inside she tucked in a mini Altoid tin and a Burt's Bees lipstick in Guava!!
I LOVE Burt's Bees!!

 but seriously...can you stand the mirror inside??  She trimmed it out with gold ric rac...so cute!!

There are SO many ways you could take this idea!
I will share the tin I made for my friend Denise a little later because she hasn't opened hers yet :)

Sunday, December 18, 2011

Deck the Halls {Around the House}


~kitchen~


~family room~


~living room~


~piano~


~foyer~


~entry~
Posted by Picasa

Thursday, December 15, 2011

Deck the Halls {The Library/Office}

So, if you remember back in this post....I "renamed" our office "the library"
Well, when I stumbled on this photo last week, I knew I must make a book tree somewhere in my home~


So, this is what I created in our little library/office
If I had the space to do big tree like the inspiration pic...I WOULD!


Lucy and I did a little craft project one night, and made the paper chains and snowflakes
I love how they POP against the chocolate brown of the walls~
(pretty obvious I love color and pattern :)


Usually during the holidays, when it comes time to wrapping presents I hole up in my bedroom on the floor, but this year I decided to make a small wrapping station

I love having everything right there at the ready!


I put my favorite papers in a metal tub and I am ready!


"brown paper packages tied up with string, these are a few of my favorite things"
Posted by Picasa

Wednesday, December 14, 2011

Deck the Halls {Outside}

As much fun as I have decorating inside...I love decorating outside too!

This year our outdoor table didn't get covered like it normally does, so I decided it was in need of a little vignette
It is so fun looking out the window and seeing this on my table, instead of a tarp!

It seems every year I do something different on my porch
The past couple of years I have kept it pretty simply, so this year I wanted it to feel "lived in" like an outdoor room

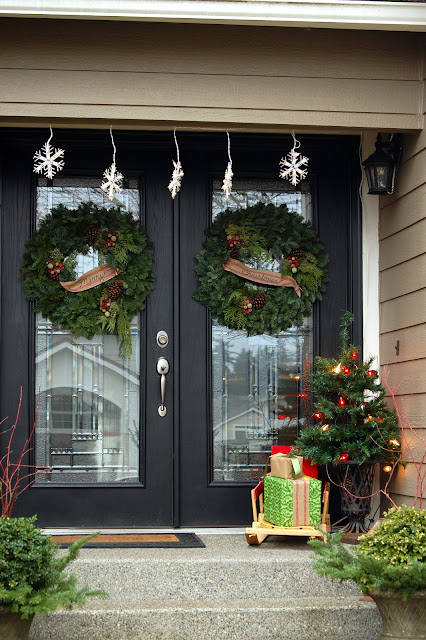
On my wreaths I used some vintage webbing that a friend sent to me, and wrote Merry and Christmas on each of them

We have had the sled since our boys were very small, so a few packages were the perfect touch
We didn't do alot of lights on our house this year, so this little tree and the snowflake lights give just the right amount of twinkle

My wooden book stack sits on my bench all year long, so a little leopard ribbon and a snip of boxwood dress it up!

I LOVE having my boxwood urns out year-round, but every fall I add in the branches to give them height, and then for the Holidays I like tucking greens around the base


Thanks for stopping by!
Posted by Picasa

Tuesday, December 13, 2011

Hot Cocoa Station 2011~


Every year I love creating a Hot Cocoa Station for my family
My kids love that everything they need is out and ready to be enjoyed!


The Santa mugs are ready and waiting...HO HO HO!
I started collecting these a couple of years ago.  I look for them at thrift stores, and really love the ones I find that have someone's name painted on the bottom...it warms my heart to think someone sat and handpainted his jolly little face.
Posted by Picasa

Tuesday, November 29, 2011

**Grand Opening** {My Etsy Shop}

I am excited to share my new etsy shop with you!!


I love crafting
I love making gifts
and sometimes when I love something, I make a whole bunch :)...so an etsy shop seemed like the perfect place for those things.
I hope to add more handmade items, and maybe even some fun treasures I find along the way...so stop in from time to time!
Posted by Picasa

Thursday, November 24, 2011

Giving Thanks~

Wishing you a very Happy Thanksgiving~
Cheers!

Tuesday, November 15, 2011

Pumpkin Snickerdoodle Whoopie Pies {In My Kitchen}

...and the Pumpkin train moves on :)

 I really have no idea how I stumble upon some of these recipes, but once again,
I am so glad I did!


Thank goodness for GOOGLE and the ability to go back and find the source :)
This recipe is from Curly Girl Kitchen, and WOW are they delicious!!
Posted by Picasa
Pumpkin Snickerdoodle Whoopie Pies


(makes about 3 dozen cookies / 18 whoopie pies)

pumpkin snickerdoodles:


•1 cup (2 sticks) unsalted butter, softened

•1 cup granulated sugar, plus 3 tablespoons, divided

•1 egg

•1 teaspoon vanilla

•1 cup canned pumpkin puree

•2 1/2 cups all-purpose flour

•1 teaspoon cinnamon, plus 1 1/2 tablespoons, divided

•1/2 teaspoon salt

•1 teaspoon baking soda

•1 teaspoon baking powder

•2 teaspoons cream of tartar


cream filling:
•1 egg white

•2 tablespoons milk

•1 teaspoon vanilla

•2 cups powdered sugar

•1 stick plus 2 tablespoons (10 tablespoons) unsalted butter, softened

1. Make the cookies:


In a mixing bowl, beat the butter and 1 cup sugar on medium speed for about 5 minutes. Add the egg and vanilla and beat for 1 minute. Add the pumpkin and beat until well combined.


In a separate bowl, whisk together the flour, 1 teaspoon cinnamon, salt, baking soda, baking powder and cream of tartar. Turn the mixer to low speed and add the dry ingredients by spoonfuls to the batter. Mix just until combined.


Cover the mixing bowl with plastic wrap and refrigerate dough for two hours.


Preheat the oven to 350 F. In a small bowl, combine 3 tablespoons granulated sugar with 1 1/2 tablespoons cinnamon. Form the dough into 1 1/2 inch balls and roll in the cinnamon/sugar mixture. Place the balls 2 inches apart on a cookie sheet lined with a Silpat baking mat or parchment paper. Bake for 12 minutes.


Slide the Silpat or parchment paper off the cookie sheet and cool cookies completely.


2. Make the cream filling.

Using the whisk attachment on your mixer, beat the egg white for 2 minutes until foamy. Add the milk and vanilla and beat for another 2 minutes. Add 1 cup of powdered sugar and the butter and beat for several minutes to combine. Add the remaining cup of powdered sugar and beat for 8-10 minutes until cream filling is very light and fluffy.


Spoon dollops of the filling onto the underside of half the cooled cookies and top with another cookie. Refrigerate any leftovers.

Monday, November 14, 2011

Seeing the difference {Photography}

I was one of the lucky winners of a giveaway to participate in Lisa's (The Long Road to China)
 photography course
"Get out of the Auto zone"
We have had 3 on-line classes so far, with this week being our last
I can't say I "totally" get it, but I am "getting" it!

Here are a few of my "homework" assignments that I shot in MANUAL :)
while sitting on my porch...I still cannot believe that I took these with my kit lens!


These two below really proved to me what can happen when you turn that dial to Manual
This first photo I took in manual


and the photo below, I took in Auto w/no flash
I cannot believe the difference in color..the above is so vibrant
so..needless to say, I am convinced that I must
"stay out of the auto zone" :)


Posted by Picasa

Tuesday, November 1, 2011

Its November!!

I am so excited that today is November 1st...it means

~the insane month of October is OVER for my sweet hardworking husband

~my sweet boy comes home for break in a little more than 2 weeks

~Thanksgiving is a mere 3 weeks away!

~I still can make LOTS of pumpkin goodies...like these pumpkins scones with maple glaze


~the fireplace will be on more often

~we will celebrate Blake's 17th

~I am left with this memory of Halloween night :)


~there will be LOTS more soup being made

~the Christmas music will be playing...NON-STOP

ahh...I love November!

Monday, October 31, 2011

Happy Halloween!

A little look at Halloweens Past...

n
Pink Swan ~ 2010
Posted by Picasa

Cheerleader ~ 2009


Little Bo Beep ~ 2008

Have a fun and safe night!

Wednesday, October 26, 2011

Violated

A few days ago, someone came into our home, while we were sleeping and stole my Macbook

MY Macbook...it was MINE
Toby bought it for me 3 years ago for my birthday, and I loved it...I had begun to use it as my personal filing system

It had everything on it...all my pictures, all the videos I had taken of Lucy since she came home, all our passwords, all my inspiration files, all my recipe files

I just can't get over it
I can't get over the fact that someone was in OUR home while we were sleeping
and
I just can't get over the fact that someone stole MY memories~

Thursday, October 20, 2011

Pumpkin Pie Popcorn {In My Kitchen}

I really have NO idea how I stumbled on this recipe from Family Bites, but let me just say...
I am SO glad I did!

Pumpkin Pie Popcorn!
I am NOT kidding...you MUST try this
(are the CAPITAL words getting my point across :)


It is a delicious caramel popcorn with a hint pumpkin pie spice
Pumpkin Pie Popcorn 
  • 10 cups air popped popcorn, salted
  • 1 cup packed brown sugar
  • 1/4 cup light corn syurp
  • 6 tablespoons butter
  • 1/2 teaspoon salt
  • 1/2 teaspoon baking soda
  • 1 1/2 teaspoons pumpkin pie spice
Preheat the oven to 250°F. Line a rimmed baking sheet with parchment paper and set aside.

Coat a large mixing bowl with nonstick cooking spray, and dump the popcorn into the bowl, taking care to pick out and discard any unpopped kernels.In a medium saucepan, whisk together the brown sugar, corn syrup, butter, salt, and 2 tablespoons of water.
Bring to a simmer over medium-high heat. Continue to simmer, whisking often, and bring to a boil.  Allow the mixture to boil for about 2 minutes, whisking occasionally. Immediately remove the pan from the heat, and whisk in the baking soda and pumpkin pie spice.
Quickly pour the hot caramel over the popcorn. Use a rubber spatula to gently fold the caramel into the popcorn, taking care to distribute it as evenly as you can. Transfer the mixture to the prepared baking sheet.
Bake for 1 hour, stirring and turning the popcorn with a spatula every 20 minutes. Remove from the oven, and place on a cooling rack for 20 minutes. Gently break up the popcorn, and serve.
**I made two batches of popcorn in my Whirly pop, and it was the perfect amount**
**I only put in 1t of pumpkin pie spice, so it wouldn't overwhelm my kids :)**

I dare you to not eat the whole batch!!

Tuesday, October 18, 2011

I'm a little obsessed with Pumpkins :)


I have gone a little crazy with the pumpkins this year :)
Every time I walk into a grocery store...I look to see what they might have

Cinderella pumpkins have always been one of my favorites, and so are ghost pumpkins, but the many colors and shapes of squash are so fun too!


Yesterday, I stopped in Walmart and they had a big box of unusual looking pumpkins :), and my cart on "auto pilot" headed right for them...I found the one below


and I loved this one because it looks EXACTLY like a faux pumpkin I already have!


And to think, we haven't even been to the pumpkin patch yet :)